Soap - Lunch and Learn Presentation
Slide 1 - Introduction
|
Why do it? "I can do that." |
Why not? "It's dangerous." |
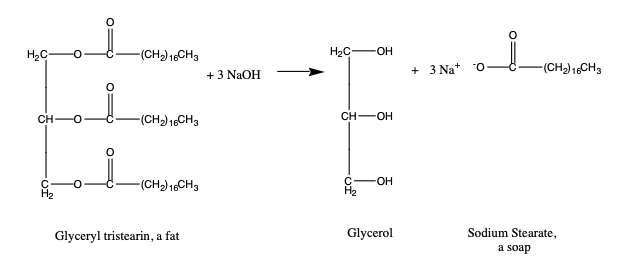
Slide 2 - Chemistry
Reference: https://laney.edu/cheli-fossum/wp-content/uploads/sites/210/2012/01/13-Saponification.pdf
Slide 3 - What you need
A recipe
Before anything else you need a recipe. i.e. a plan. This will inform the rest of your steps.
Are you doing a 500 gr batch, or a 2kg batch?
Are you using hard oils, or soft? or some mix ?
Are you using KOH or NaOH?
Will you use additives like essential oils or clay ? How much?
https://www.thesage.com/calcs/LyeCalc.html
http://soapcalc.net/calc/soapcalcwp.asp
Super fat: if you were a chemist who want to do to the saponification chemical reaction you would want to provide exactly the right amount of both ingredients suc that there was none of either reagent left; a perfect ratio of ingredients. In the real world we make mistakes and we don't have sensitive skin. s a results often when making soap we do what we
There as lots of ideas at the library and online.
About 50% of the recipes are crap because they say something like : Melt some Castile soap and add colour and smell. Which is not helpful if you are _actually_ making the soap.
Protective Equipment
- Goggles
- Gloves
- Apron
- Surface covering
Equipment
- Work Space
- Stove, hot plate, burner
- Two pots, ideally stainless steel - NOT aluminum, the lye will eat the aluminum
- Thermometer
- Scale
- Stainless steel spoon
- Silicone Spatula
- Hand mixer , Braun et el - This makes mixing an attainable chore , not arm breaking.
- A place to clean up.
- A place to put soap to cure. I have an old board of wood where I put moulds on the first day to sure and cool, and the cut bar for the rest of the curing.
Optional: Cock pot - Best for Hot Process
Value Village is a great place to get what you need and not break the bank. Although if you are fastidious you can use the same stuff as you use for food, better to have dedicated equipment.
- Moulds - Where you pour the finished soap to cure.
- I use silicone muffin moulds
- old milk or soy tetra-pak boxes
- various containers around the house
- Fancy ice-cube trays can work.
- and you can get purpose made moulds for soap.
Key points on moulds:
- heat resistant
- not porous
- not too rigid - as you need to get the soap out afterwards.
Lye
This is the lone primary dangerous chemical I spoke about above.
Alternatively you can use KOH, but I don't know much about that .
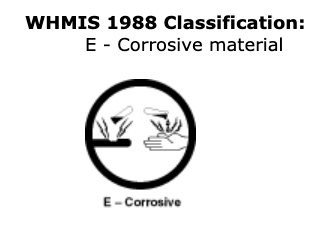
It is Corrosive ! which means that it will melt a hole in you if it comes into contact with your skin.
This is why we wear protective equipment.
If you get any one you the first thing you will notice is that you skin is "slippery" almost like soap.
RINSE IMMEDIATELY with Large amounts of cold water.
I've heard that vinegar is good to have on hand as it neutralizes it.
Lye can be tough to source.
- Home hardware does have it
- https://www.homehardware.ca/search?query=lye
- 500g $8.49 /EA
- 3kg $29.99 /EA
† Keep in mind very little Alkali is required; for a 500 ml of oil recipe, 66 grams of NaOH is required.
Can do Kajiji and Amazon.ca as well.
Places that do not carry lye:
- Canadian Tire
- Rona
- Home despot
Oil
Any oil will work but different oils will change your recipe slightly.
- Physical hardness of the resulting soap.
- how much lather there is.
- how hard does the soap stay as you use it, does it get gummy when wet?
- are there any moisturizing properties? grapeseed oil, avocado oil
- aroma / smell
- allergies
Coconut oil is a "Hard" oil, Olive oil is a "soft" oil.
When I choose oils I consider hardness versus softness, cost, and environmental impact.
I try to steer clear of palm oil for the environmental aspect ( it's quite impactful I understand ), but ask me what the environmental impact of NaOH production is :(
about soap properties:
- https://simplelifemom.com/2018/03/18/soap-making-oils/
- Saponification number
- https://classicbells.com/soap/iodineINS.html Idodide and INS numbers
Water
Small amounts are required, the less you use , the sooner you soap will be cured. The more you use the more help you have getting the reagents to react with each other.
Fragrances and Additives
This stuff is optional
- Essential oils
- Extracts
- Particles of stuff:
- Charcoal
- oatmeal
- lavender buds
- Milk
- honey
- bee's wax
- Clay
- apricot / almond grit
- colourants
- sparkles
\
Slide 3 - Cold Process
- Setup, cover surfaces, let everyone know what you are doing, no accidents.
- Measure out ingredients.
- Add lye to water, be ready for heat.
- Heat oil to get to the same temperature as the lye, this will melt any oils that are solid at room temperature like coconut oil.
- Add the lye to the oil - gently.
- Hand blend until trace.
- Pour
- Clean up
- Cure - Overnight
- Cut - No sooner than the day after.
Slide 4 - Now you !
Where to go from here?
Set aside a day to do it.
- Set up
- Measuring
- Mixing
- Pouring
- Clean up.
Get a sample of NaOH from David in a glass jar.
Slide 5 - Advanced topics
- Potassium hydroxide ( KOH ) Versus Sodium Hydroxide ( NaOH )
- Trying oil combos
- Glycerine soap ( Transparent Soap )
https://laney.edu/cheli-fossum/wp-content/uploads/sites/210/2012/01/13-Saponification.pdf
Bonus Slide 6 - Glycerine soap
I want to do this.
Adding alcohol to soap basically to makes it transparent.
Process:
- Heat the soap until melted
- Add alcohol
- skim off sap from the top.
Bonus Slide 7 - Oil options
Hard oils versus Soft oils
https://www.lovinsoap.com/oils-chart/
My mixes, experiments and refinements : Soap
- Coconut -> hard
- Olive oil -> soft
What mixes is good?

